
15 Classic American Recipes You’ll Want to Make Again and Again
There’s something about classic American recipes that just never gets old. Whether it’s the comfort of a warm bowl of mac and cheese, the juiciness of a perfectly grilled burger, or the sweetness of blueberry pancakes, these dishes are the heart and soul of American kitchens. Every time I make them, I’m reminded of family dinners, lazy weekends, and the joy of sharing a meal with the people I love most. And today, I’m so excited to share 15 of these iconic recipes with you!
These aren’t just any recipes; they’re the ones that have stood the test of time. The ones that, no matter how many years go by or how many new food trends come and go, always find their way back to the dinner table.
If you’re anything like me, you love recreating those classic flavors and putting your own spin on them. These recipes are perfect for sharing with friends and family, whether you’re hosting a casual weekend cookout or looking for something comforting after a long day.
1. Grilled Cheeseburgers

Grilled cheeseburgers are the ultimate crowd-pleaser. They’re juicy, flavorful, and packed with all the classic toppings that make every bite irresistible. Whether you’re grilling up a batch for a weekend cookout or craving a comforting dinner, these burgers hit the spot every time. Plus, with the perfect melt of cheese on a warm, toasted bun, they’re always a guaranteed favorite.
Read more about this recipe and print off a recipe card here.
Servings: 4 burgers
Ingredients:
- 1 pound ground beef
- ½ tsp salt
- ¼ tsp pepper
- 4 slices of cheese (American or cheddar)
- 4 burger buns
- 1 small lettuce
- ½ cup pickled pink onion
- Ketchup, mustard, mayonnaise
- 4 slices of bacon
- ½ cup pickled gherkins
- 1 tomato
- Cooking spray
Instructions:
-
Preheat the grill to medium-high heat.
-
In a bowl, gently mix the ground beef with salt and pepper. Be careful not to overwork the meat. Form the mixture into 4 equal patties, making a slight indentation in the center of each to prevent puffing during cooking.
-
Place the patties on the grill. Use a cooking spray or a teaspoon of olive oil. Grill for about 4-5 minutes on one side, then flip and cook for another 3-4 minutes for medium-rare, or longer if you prefer them well done.
-
In the last minute of cooking, add a slice of cheese to each patty.
-
Grill the bacon until crispy.
-
Place the cooked patties on the bottom half of the buns. Add bacon and your favorite toppings, such as pickled onions, lettuce, tomato slices, gherkins, and condiments. Top with the other half of the bun.
-
Serve your burgers with a side of chips, fries, or a salad and enjoy!
2. Blueberry Pancakes

Blueberry pancakes are the breakfast of champions! Soft, fluffy, and bursting with sweet, juicy blueberries in every bite, they’re the perfect way to start your day. Whether you’re whipping them up for a lazy weekend brunch or a quick weekday treat, these pancakes are always a crowd favorite. Top them with a little butter and syrup, or maybe a sprinkle of powdered sugar, and you’ve got a delicious morning indulgence that never disappoints!
Read more about this recipe and print off a recipe card here.
Servings: 10 pancakes
Ingredients:
Pancake mixture:
- 2 eggs
- 2 cups gluten-free all-purpose flour
- 2 tbsp sunflower oil (plus oil greasing the skillet)
- 2 tbsp maple syrup
- 1/2 tbsp sugar
- 1 tsp baking powder
- 1 tbsp baking soda
- 1/4 teaspoon salt (optional)
- 1 cup of milk
- ½ cup of fresh blueberries
Blueberry Jam:
- ½ cup of fresh blueberries
- 2 tbsp sugar
- 2 tbsp water (optional/ as needed)
- 1 tbsp lemon juice
Decorate with:
- 1 tbsp Pistachios
- Blueberries
Instructions:
-
Whisk together the GF-flour, sugar, baking powder, baking soda, and salt in a large bowl.
-
In another bowl, mix the eggs, sunflower oil, and vanilla extract until combined.
-
Add the milk and mix well.
-
Pour the wet ingredients into the dry ingredients and stir gently until just combined. Do not overmix, it’s okay if there are small lumps.
-
Gently fold in the blueberries.
-
Heat a non-stick skillet or griddle over medium heat and grease it with butter or oil.
-
Scoop about 1/4 cup of batter for each pancake onto the skillet.
-
Cook until bubbles form on the surface and the edges look set (about 2-3 minutes). Flip and cook the other side for another 1-2 minutes, until golden brown.
-
Place a small pan or saucepan over low heat. Pour the blueberries, sugar, lemon juice, and 2 tbsp of water into the pan.
-
Bring to a boil.
-
Cook until the mixture thickens and the blueberries are softened. (If you prefer juicier jam, you can leave it slightly runny, but the blueberries should still soften.)
-
Serve the pancakes warm.
-
Pour the blueberry jam on top and sprinkle with pistachios.
3. Buttermilk Fried Chicken

Buttermilk fried chicken is the kind of comfort food that makes everything feel right in the world. Crispy, golden brown on the outside and juicy on the inside, it’s a dish that’s perfect for any occasion. The buttermilk marinade helps tenderize the chicken, adding a tangy flavor that makes each bite unforgettable. Whether you’re serving it for a family dinner or bringing it to a potluck, this fried chicken is always a hit, and it’s so much easier to make than you might think!
Servings: 4 servings
Ingredients:
- 6 chicken drumsticks
- 2 cups all-purpose flour
- 2 cups buttermilk
- 1 teaspoon paprika
- 1 teaspoon garlic powder
- 1 teaspoon onion powder
- 1 teaspoon salt
- 1 teaspoon pepper
- Vegetable oil for frying
Instructions:
-
Rinse the chicken drumsticks and pat them dry.
-
Place the chicken in a bowl and pour buttermilk over them. Add half of the salt and pepper. Ensure the chicken is coated, then cover and chill for at least 2 hours.
-
In another bowl, mix the flour, paprika, garlic powder, onion powder, remaining salt, and remaining pepper to create the seasoned flour mix.
-
Remove the chicken from the buttermilk, letting any excess liquid drip off.
-
Roll the drumsticks in the seasoned flour, ensuring they are well coated. Press the flour onto the chicken for a crispy coating.
-
Heat vegetable oil in a deep fryer or deep pot to 350-375°F (175-190°C).
-
Carefully add the coated chicken to the hot oil, a few pieces at a time, making sure not to overcrowd the fryer. Fry for 12-15 minutes until golden brown, crispy, and cooked through. The internal temperature should reach 165°F (74°C).
-
Use a slotted spoon to remove the fried chicken and place them on paper towels to drain excess oil.
-
Let the chicken cool slightly before serving. Enjoy your buttermilk fried chicken with your favorite sides!
4. Chicken Club Sandwich

A chicken club sandwich is the perfect combination of crispy, tender, and savory goodness all packed between two slices of toasted bread. With juicy grilled chicken, crispy bacon, fresh lettuce, and a dollop of creamy mayo, it’s the kind of sandwich that hits all the right notes. Whether you’re enjoying it for lunch, dinner, or even as a hearty snack, this sandwich is guaranteed to satisfy your cravings. It’s simple, delicious, and totally satisfying, what’s not to love?
Servings: 2 sandwiches
Ingredients:
- 3 slices of white bread (1.5 for toasting, 1.5 for the sandwich)
- 2 tbsp mayonnaise
- 2 lettuce leaves
- 2 slices of deli chicken breast
- 2 slices of American cheese
- 4 slices of cooked bacon
- 1 tomato, sliced
Instructions:
- Toast three slices of white bread until they’re crispy and golden brown.
- Spread a thin layer of mayonnaise on one side of each toasted slice.
- Place one slice of bread, mayo-side up, on a plate or cutting board to form the base.
- Layer on 1 lettuce leaf, 1 slice of deli chicken, 1 slice of cheese, and 2 crispy bacon slices.
- Place the second slice of bread on top, mayo-side down, and spread a bit of mayo on the top side of that slice.
- Add another layer of toppings: 1 lettuce leaf, 1 slice of deli chicken, 1 slice of cheese, 2 bacon slices, and a few tomato slices.
- Finish with the third slice of bread, mayo-side down.
- Press the sandwich gently to help it hold together, then slice it diagonally or into quarters.
- Serve immediately and enjoy this stacked, flavorful creation!
5. Cobb Salad

A Cobb salad is like a little bite of everything you love in one bowl! Packed with crispy bacon, creamy avocado, hard-boiled eggs, tender chicken, and a mix of fresh veggies, it’s the perfect balance of flavors and textures. Plus, it’s topped with a tangy dressing that ties it all together.
Read more about this recipe and print off a recipe card here.
Servings: 2-3
Ingredients:
- 2 cups iceberg lettuce, chopped
- 2 large hard-boiled eggs, chopped
- 4 slices cooked bacon, crumbled
- 1 chicken breast, grilled or roasted, chopped
- 1 avocado, diced
- 1 cup cherry tomatoes, halved
- ¼ cup blue cheese or feta cheese, crumbled
- ¼ cup red onion, thinly sliced (optional)
- 2 tbsp olive oil
- 1 tbsp red wine vinegar (or lemon juice)
- Salt and pepper to taste
Instructions:
- Cook the bacon until crispy and crumble it. Boil the eggs and chop them. Grill or roast the chicken breast, then chop it into bite-sized pieces. Dice the avocado and halve the cherry tomatoes.
- In a large bowl, arrange the chopped iceberg lettuce as the base. Arrange the chopped chicken, hard-boiled eggs, bacon, avocado, tomatoes, and cheese on top in rows or sections for a traditional Cobb salad look.
- In a small bowl, whisk together the olive oil, red wine vinegar (or lemon juice), salt, and pepper. Taste and adjust the seasoning as needed.
- Drizzle the dressing over the salad or serve it on the side. Toss everything together or enjoy the separate sections for a colorful and fresh meal.
6. Corn Dogs

Corn dogs are the ultimate nostalgic snack, crispy on the outside, tender on the inside, and a fun twist on a classic hot dog. Whether you’re enjoying them at a fair, tailgate, or making them at home for a casual dinner, they’re always a crowd favorite. The golden cornmeal batter adds the perfect crunch, while the hot dog inside stays juicy and flavorful. Serve with your favorite dipping sauces, and you’ve got a treat that’s sure to bring smiles all around!
Read more about this recipe and print off a recipe card here.
Servings: 6
Ingredients:
- 6 hot dogs
- 6 wooden skewers or sticks
- 3/4 cup yellow cornmeal
- 3/4 cup all-purpose flour
- 1/4 teaspoon salt
- 1/4 teaspoon baking powder
- 1/8 teaspoon baking soda
- 1 tablespoon granulated sugar
- 1 large egg
- 3/4 cup buttermilk (or you can use regular milk with a tablespoon of vinegar or lemon juice added)
- Vegetable oil, for frying
Instructions:
-
Dry the hot dogs with paper towels and skewer them with wooden sticks, ensuring the stick is centered and goes about halfway up the hot dog.
-
In a large bowl, whisk together the cornmeal, flour, salt, baking powder, baking soda, and sugar. In a separate bowl, beat the egg and mix in the buttermilk. Pour the wet ingredients into the dry ingredients and stir until just combined. The batter should be thick enough to coat the hot dogs well. If it’s too thick, add a little more buttermilk.
-
Pour vegetable oil into a deep fryer or large pot, ensuring there’s enough oil to completely submerge the corn dogs. Heat the oil to 350°F (175°C) and use a thermometer to check the temperature.
-
Pour the batter into a tall glass for easier dipping. Dip each skewered hot dog into the batter, ensuring it’s completely coated. Let the excess batter drip off, then carefully lower it into the hot oil. Fry the corn dogs in batches, if necessary, for 2-3 minutes or until golden brown and crispy.
-
Once cooked, remove the corn dogs from the oil using a slotted spoon and drain them on paper towels to remove any excess oil.
-
Serve the corn dogs hot with your favorite condiments like ketchup, mustard, or mayonnaise.
7. Grilled Hot Dogs

Grilled hot dogs are the quintessential summer snack! With their smoky, charred exterior and juicy, flavorful inside, they’re the perfect choice for a backyard cookout or a quick weeknight dinner. Whether you like them with classic mustard and ketchup or piled high with toppings like onions, relish, and cheese, these hot dogs never fail to satisfy. Toss them on the grill, and you’ve got a simple yet irresistible meal that everyone will love!
Read more about this recipe and print off a recipe card here.
Servings: 8 hotdogs
Ingredients:
- 8 hotdogs
- 8 classic hotdog buns
- Ketchup
- Mustard
- Mayonnaise (optional)
Toppings (choose a selection based on preference):
- 1 cup shredded cheddar cheese
- 6-8 small, pickled gherkins
- ½ cup chopped onions (raw or grilled)
- ¾ cup diced tomatoes
- Fresh herbs (such as cilantro or chives)
Instructions:
-
Preheat your grill to medium-high heat (about 375°F to 400°F).
-
If desired, make shallow diagonal cuts in the hot dogs to help them cook evenly and get a nice char.
-
Place the hot dogs on the grill and cook for about 6-8 minutes, turning occasionally, until they are heated through and have nice grill marks.
-
In the last 1-2 minutes of grilling, place the hot dog buns on the grill to lightly toast them, watching closely to prevent burning.
-
Once the hot dogs are done, remove them from the grill and place each one inside a toasted bun.
-
Set up a topping station with sliced tomatoes, shredded onions, cheese, and your favorite sauces like mustard or ketchup, so guests can customize their hot dogs. Enjoy!
8. Ham & Cheese Sliders
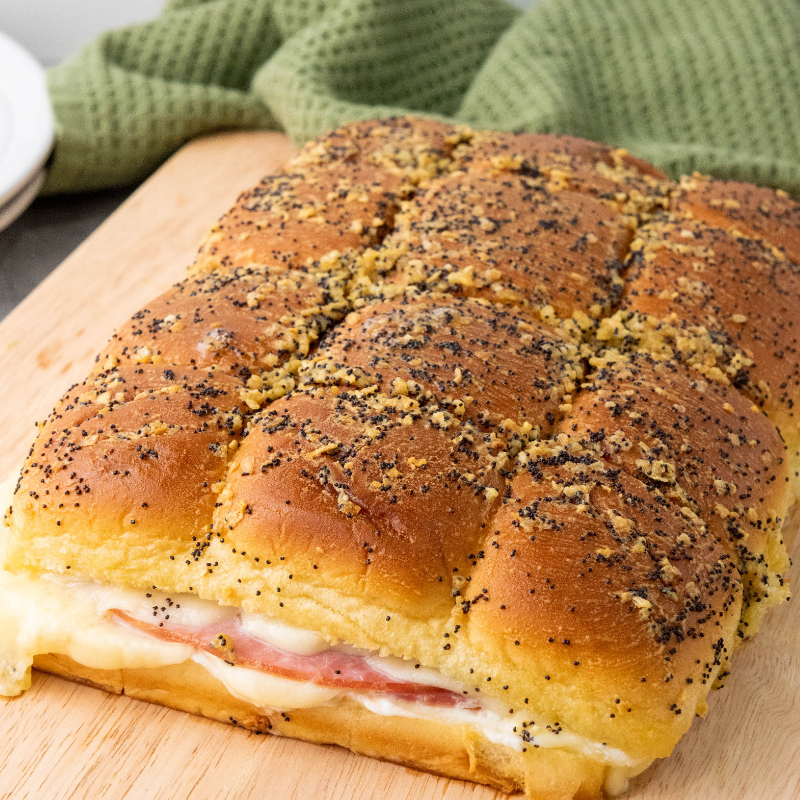
Ham and cheese sliders are the ultimate crowd-pleasing bite-sized treat! With tender ham, melted cheese, and a perfectly toasted bun, these little sandwiches are packed with all the flavors you love. They’re so easy to make, yet feel like a special snack, whether you’re serving them for a party, game day, or a simple family meal. The best part? You can customize them with your favorite condiments or spices to make them your own. Once you start, it’s hard to stop!
Read more about this recipe and print off a recipe card here.
Servings: 12 sliders
Ingredients:
- 12 slider buns (like Hawaiian rolls)
- ½ lb thinly sliced cooked ham
- 12 slices Swiss cheese
- ¼ cup mayonnaise
- 1 tbsp Dijon mustard
- 4 tbsp butter, melted
- 1 tbsp minced onion
- 1 tbsp poppy seeds
Instructions:
-
Preheat your oven to 350°F (175°C).
-
Cut the slider buns in half and place the bottom halves in a baking dish.
-
Spread mayonnaise on the buns, then layer Swiss cheese, ham, and more Swiss cheese on top. Cover with the top halves of the buns.
-
In a bowl, mix together melted butter, Dijon mustard, minced onion, and poppy seeds to make the glaze.
-
Brush the glaze generously over the top of the sliders, ensuring they are evenly covered.
-
Cover the baking dish with aluminum foil and bake for 15 minutes. Remove the foil and bake for an additional 5-10 minutes, or until the tops are lightly browned and crispy.
-
Let the sliders cool for a few minutes before serving.
9. Key Lime Pie

Key lime pie is the perfect balance of tart and sweet, with a creamy filling and a buttery graham cracker crust that melts in your mouth. It’s the kind of dessert that feels refreshing yet indulgent, perfect for a summer gathering or anytime you need a little citrusy pick-me-up. The smooth, tangy lime filling paired with a dollop of whipped cream makes every bite a little taste of paradise. If you’re a fan of zesty desserts, this one is a must-try!
Read more about this recipe and get a printable recipe card here.
Servings: 8-10
Ingredients:
For the Graham Cracker Crust:
- 1 ½ cups (180 g) graham cracker crumbs
- ⅓ cup (65 g) granulated sugar
- ½ teaspoon salt
- 6 tablespoons (85 g) unsalted butter, melted
For the Key Lime Filling:
- 4 large egg yolks
- 1 can (14 oz / 396 g) sweetened condensed milk
- ½ cup (120 ml) fresh key lime juice (about 12 key limes)
- 1 tablespoon key lime zest (or regular lime zest)
- ½ teaspoon vanilla extract
- ⅛ teaspoon salt
For the Whipped Cream Topping:
- 1 cup (240 ml) heavy whipping cream
- 2 tablespoons (15 g) powdered sugar
- ½ teaspoon vanilla extract
- Key lime zest, for garnish
Instructions:
- Preheat the oven to 350°F (175°C).
- In a bowl, mix graham cracker crumbs, sugar, salt, and melted butter until evenly combined.
- Press the mixture firmly into the bottom and sides of a 9-inch (23 cm) pie pan.
- Bake for 8 minutes, then let cool while preparing the filling.
- In a large bowl, whisk the egg yolks until slightly thickened.
- Whisk in the sweetened condensed milk, key lime juice, lime zest, vanilla extract, and salt until smooth.
- Pour the filling into the cooled crust and smooth the top.
- Bake at 350°F (175°C) for 12-15 minutes, until the center is just set (a slight jiggle is fine).
- Let the pie cool at room temperature for 30 minutes, then refrigerate for at least 3 hours (or overnight) until fully set.
- Using a hand mixer or stand mixer, beat heavy whipping cream, powdered sugar, and vanilla on medium-high speed until stiff peaks form.
- Spread or pipe the whipped cream on top of the chilled pie.
- Garnish with key lime zest and extra graham cracker crumbs if desired.
- Slice, serve, and enjoy!
10. Loaded Tater Tots

Loaded tater tots are the ultimate comfort food snack! Crispy, golden tots piled high with cheese, bacon, sour cream, and all your favorite toppings. They’re perfect for game day, parties, or just when you’re craving something indulgent and fun. Every bite is a crispy, cheesy, savory explosion that’s sure to satisfy even the hungriest of appetites.
Read more about this recipe and print off a recipe card here.
Servings: 4-6
Ingredients:
- 1 package of frozen tater tots (about 32 oz)
- 8 slices of bacon, chopped
- 1 cup queso
- 1/2 cup ranch dressing
- 2 scallions, thinly sliced
- Salt and pepper to taste
Instructions:
-
Preheat your oven to 425°F (220°C). If your tater tot package recommends a different temperature, adjust accordingly to accommodate both the tater tots and bacon.
-
Spread the tater tots in a single layer on a baking sheet. Bake according to the package instructions, usually around 20-25 minutes, until golden and crispy.
-
Arrange the bacon slices in a single layer on a baking rack set on a baking sheet. This allows the bacon to cook evenly.
-
Place both baking sheets in the oven. The bacon will need 15-20 minutes to become crispy, but start checking around 12 minutes to avoid overcooking. Once crispy, remove the bacon and let it cool slightly before chopping it into pieces.
-
Slice the scallions and chop the bacon.
-
Warm the queso in a microwave-safe bowl or on the stovetop for 2-3 minutes until heated through and pourable.
-
Once the tater tots are baked, transfer them to a large serving dish.
-
Drizzle the warm queso evenly over the crispy tater tots.
-
Sprinkle the chopped bacon on top.
-
Drizzle ranch dressing over the bacon and tater tots.
-
Garnish with the sliced scallions.
-
Finish with a light sprinkle of salt and pepper. Serve immediately while everything is still warm and inviting.
11. Corn Dip

Corn dip is a deliciously creamy, cheesy, and totally addictive snack that’s perfect for any occasion. With sweet corn, tangy sour cream, a bit of heat from jalapeños, and plenty of melted cheese, this dip is always a hit at parties, barbecues, or casual get-togethers. It’s easy to make, super flavorful, and great for scooping with chips, crackers, or veggies. Whether you’re feeding a crowd or just treating yourself, this dip will definitely disappear fast!
Read more about this recipe and print off a recipe card here.
Servings: 4
Ingredients:
- 2 (15 oz) cans of sweet corn kernels
- 4 slices of bacon
- 1 cup mayonnaise
- 1 cup sour cream
- 1 cup Mexican shredded cheese
- 3 scallions
- 1 jalapeno
- ½ tsp black pepper, or to taste
- ¼ tsp garlic powder
- ¼ tsp onion powder
Instructions:
-
Drain the corn thoroughly, ensuring all liquid is removed.
-
Cook the bacon in a pan until it reaches your preferred level of crispiness.
-
Chop the scallions, jalapeño, and cooked bacon. Set them aside.
-
In a medium-large bowl, combine the corn, sour cream, mayonnaise, shredded cheese, chopped bacon, scallions, jalapeño, and seasoning. Stir until everything is well mixed.
-
Refrigerate until ready to serve.
-
Serve chilled with tortilla chips. Enjoy!
12. Air Fryer S’mores

Air fryer s’mores are a game-changer for this classic campfire treat! With all the gooey chocolate and melty marshmallows wrapped up in a crispy graham cracker crust, you get the perfect combination of sweet, crunchy, and gooey, all without having to light a fire. The air fryer makes it super easy to achieve that golden-brown marshmallow with minimal mess.
Read more about this recipe and print off a recipe card here.
Servings: 2
Ingredients:
- 2 graham crackers
- 1 marshmallow, cut in half
- 1-2 squares squares of chocolate (such as Lindt or Hershey’s)
Instructions:
- Preheat the air fryer to 390ºF
- Place the marshmallow halves, cut-side down onto a graham cracker. Press the marshmallow so that it sticks to the graham cracker.
- Place both graham crackers, one with marshmallow and one without, into the air fryer. Close and cook for about 1 ½ minutes or until the marshmallow is golden brown.
- Remove the graham cracker with the marshmallow. Place a piece of chocolate onto the second graham cracker. Allow it to melt for a couple seconds so that it sticks to the graham cracker. Return the chocolate graham cracker to the air fryer for about 30 seconds, until the chocolate is melted, being careful not to burn the chocolate.
- Press the graham crackers together and serve warm.
13. Copycat Big Mac Sauce

Copycat Big Mac sauce is the secret ingredient that takes any burger to the next level! With its creamy, tangy, and slightly sweet flavor, this sauce is what makes the Big Mac so unforgettable. Making it at home means you can slather it on burgers, fries, or even use it as a dip for your favorite snacks. With just a few simple ingredients, you can recreate that signature fast-food flavor right in your own kitchen. It’s the ultimate topping for anyone who loves a little extra flavor in every bite!
Servings: About 1 cup
Ingredients:
- ½ cup mayonnaise
- 4 tbsp relish
- 2 tbsp Dijon mustard
- 1 tbsp white vinegar
- 1 tsp garlic powder
- 1 tsp onion powder
- 1 tsp paprika powder
Instructions:
- Mix all ingredients in a small bowl until well combined.
- Serve on burgers, or with fries.
- Enjoy
14. Mac and Cheese

Baked mac and cheese is the ultimate indulgence, with a rich, creamy cheese sauce and a golden, crispy topping that adds the perfect crunch. The layers of cheesy goodness meld together as it bakes in the oven, creating a dish that’s comforting, flavorful, and oh-so-satisfying. It’s the kind of mac and cheese that you’ll want to make for family dinners, potlucks, or just when you’re craving a little extra comfort. Serve it up hot, and get ready for everyone to go back for seconds!
Read more about this recipe and print off a recipe card here.
Servings: 8
Ingredients:
- 16 oz elbow macaroni
- 3 cups sharp cheddar cheese, shredded
- 2 cups Gruyère cheese, shredded
- 1 stick unsalted butter, divided
- 1/4 cup all-purpose flour
- 3 cups whole milk
- 1 cup whipping cream
- 1/2 teaspoon smoked paprika
- Salt and pepper to taste
- 1 cup panko breadcrumbs
- 1/2 cup grated Parmesan cheese
Instructions:
-
Preheat your oven to 350°F (175°C). Lightly grease a 9×13-inch baking dish.
-
Cook the macaroni according to package instructions until al dente. Drain and set aside.
-
In a large saucepan, melt 1/2 stick (4 tablespoons) of butter over medium heat. Once melted, whisk in the flour and cook for 1-2 minutes until bubbly and lightly golden.
-
Gradually whisk in the milk and whipping cream, ensuring there are no lumps. Continue to cook, stirring constantly, until the mixture thickens, about 5-7 minutes.
-
Stir in the smoked paprika, salt, and pepper.
-
Remove the saucepan from heat and stir in the shredded sharp cheddar and Gruyère cheeses until fully melted and smooth.
-
Taste and adjust seasoning with salt and pepper as needed.
-
Add the cooked macaroni to the cheese sauce and stir until well combined.
-
Pour the macaroni and cheese mixture into the prepared baking dish.
-
In a small saucepan, melt the remaining 1/2 stick (4 tablespoons) of butter. Once melted, mix in the panko breadcrumbs until they are well coated.
-
In a small bowl, combine the buttered panko breadcrumbs and grated Parmesan cheese.
-
Sprinkle the breadcrumb mixture evenly over the macaroni and cheese.
-
Bake in the preheated oven for 20-25 minutes, or until the top is golden brown and the sauce is bubbling around the edges.
-
For a crispier topping, you can broil the dish for an additional 2-3 minutes, keeping a close eye to prevent burning.
-
Remove from the oven and let it sit for a few minutes before serving.
15. Fried Chicken Sandwich

A fried chicken sandwich is the perfect combination of crispy, juicy, and savory all in one bite. With a golden-brown, crunchy chicken fillet tucked between a soft, toasted bun, it’s comfort food at its best. Add your favorite toppings like pickles, slaw, or spicy mayo, and you’ve got a sandwich that packs a punch of flavor. Whether you’re enjoying it for lunch or dinner, this fried chicken sandwich is sure to become a fast favorite in your meal rotation!
Servings: 2
Ingredients:
For the Buttermilk Fried Chicken:
- 2 boneless, skinless chicken thighs
- 1 cup (240 ml) buttermilk
- 1 teaspoon hot sauce
- 1 teaspoon salt
- ½ teaspoon black pepper
- ½ teaspoon smoked paprika
- ½ teaspoon garlic powder
- ½ teaspoon onion powder
For the Dredge:
- 1 cup (125 g) all-purpose flour
- ¼ cup (30 g) cornstarch
- 1 teaspoon salt
- ½ teaspoon black pepper
- ½ teaspoon smoked paprika
- ½ teaspoon cayenne pepper (optional for spice)
- ½ teaspoon garlic powder
- ½ teaspoon onion powder
- 1 egg
- 1 tablespoon buttermilk
For Frying:
- 2 cups (480 ml) vegetable oil (for frying)
For the Garlic Aioli:
- ¼ cup (60 g) mayonnaise
- 1 clove garlic, minced
- 1 teaspoon lemon juice
- ¼ teaspoon salt
- ¼ teaspoon black pepper
For Assembling:
- 2 brioche buns, toasted
- 4 bread and butter pickles
Instructions:
-
In a bowl, whisk together buttermilk, hot sauce, salt, black pepper, smoked paprika, garlic powder, and onion powder.
-
Submerge the chicken thighs in the marinade, cover, and refrigerate for at least 2 hours (or overnight for best results).
-
In a shallow dish, mix flour, cornstarch, salt, black pepper, smoked paprika, cayenne (if using), garlic powder, and onion powder.
-
In a separate bowl, whisk together the egg and 1 tablespoon of buttermilk.
-
Remove the chicken from the buttermilk marinade and let excess drip off.
-
Dredge each thigh in the flour mixture, then in the egg mixture, and back into the flour mixture, pressing to create a craggy texture.
-
Heat vegetable oil in a deep skillet or Dutch oven to 350°F (175°C).
-
Fry chicken for 5-7 minutes per side, or until golden brown and cooked through (internal temperature should reach 165°F / 74°C).
-
Drain on a wire rack over a baking sheet to keep it crispy.
-
In a small bowl, mix mayonnaise, minced garlic, lemon juice, salt, and black pepper. Set aside.
-
Spread garlic aioli on both halves of the toasted brioche bun.
-
Place a crispy fried chicken thigh on the bottom bun.
-
Add 2 pickles on top of the chicken.
-
Add butter lettuce if desired.
-
Top with the other half of the bun and press gently.
No matter what you’re in the mood for, these classic dishes are sure to satisfy. From crispy fried chicken to cheesy comfort food like mac and cheese, each recipe brings its own unique flavor to the table. Whether you’re cooking for a crowd or just whipping up something special for yourself, these dishes are all about good food, great company, and making memories.


