
30 Best Tailgating Snacks for Game Day
Tailgating days always feel extra fun because the food sets the whole vibe. I love walking up to a table piled with snacks, dips, and little bites everyone can nibble on while chatting and cheering. There’s something about easy, hand-held food that just fits the energy of game day, and I always get excited planning what I’m bringing.
I’ve learned that keeping things simple makes the day so much better. I like to pack a cooler with things that travel well and don’t need any last-minute fuss. Sliders, dips, party mixes, and sweet treats are usually my go-tos because they disappear fast and they make everyone happy. Plus, there’s nothing better than hearing someone ask, “Who made this?”
If you’re putting together a tailgate menu and want ideas that feel fun, easy, and crowd-friendly, this list has plenty to choose from. I pulled together my favorite snacks to help you create a spread that keeps everyone snacking from kickoff to the final play. Let’s get into the good stuff and make your game day delicious.
1. Pizza Bagel Bombs

I always bring these to tailgates because they’re fun, filling, and people grab them faster than I can set the tray down. They taste like a tiny, cheesy surprise wrapped in soft homemade dough, and they’re so easy to pop in your mouth while you’re chatting or keeping an eye on the game. I love that you can make them ahead and serve them warm or room temp, and they still feel like a little moment of comfort food magic. These are the kind of bites that get everyone asking, “Wait, what are those?” before reaching for another.
GET THE RECIPE2. Strawberry Crunch Party Mix

This one always makes me smile because it brings a little sweetness and color to the tailgate table, and people can never resist grabbing a handful as they walk by. It’s crunchy, fruity, and a little bit nostalgic, almost like a snacking version of strawberry shortcake. I love how easy it is to toss together ahead of time, and it packs perfectly into a big bowl or container that everyone can dip into all day long. It’s the kind of treat that disappears fast and has everyone asking what’s in it because it tastes like way more effort than it actually takes.
GET THE RECIPE3. Air Fryer Tortilla Chips

I make these all the time for tailgates because they taste so fresh and they’re ridiculously easy. There’s something fun about showing up with warm, crisp chips that didn’t come from a bag, and they always get extra attention on the snack table. I love that you can season them however you want and pair them with pretty much any dip you’re bringing along. They’re light, crunchy, and perfect for snacking while everyone hangs out and waits for the game to start.
Servings: 24 tortilla chips
Ingredients:
- 4 Yellow Corn Tortillas
- Coarse Salt
- Cooking Spray
Instructions:
-
Cut the four corn tortillas into six equal wedges, just like slicing a pie.
-
Arrange as many pieces as you can in a single layer in the air fryer basket. The amount will vary depending on the size and shape of your air fryer.
-
Lightly spray the tortilla pieces with cooking spray, then sprinkle with coarse salt to taste.
-
Preheat the air fryer for about 1 minute before cooking.
-
Air fry the tortilla chips at 300°F for 8 minutes, or until crisp and golden. Repeat with the remaining pieces until all are cooked. Enjoy warm or cooled!
4. Caramelized Onion Dip

This one always feels like a little upgrade to the usual tailgate spread, and people dive into it the second it hits the table. It’s rich, savory, and full of that slow-cooked onion flavor that makes everyone pause mid-bite and go back for more. I love bringing it because it pairs with everything from chips to veggies, and it somehow tastes even better as it sits. Plus, it’s one of those dips that looks fancy but comes together so easily, which is always a win on game day.
GET THE RECIPE5. Chocolate Banana Pops

These are such a fun treat to bring along because they’re sweet, simple, and everyone lights up when they see them. They feel a little nostalgic, almost like something you’d grab at a summer fair, and they’re perfect for snacking between plays. I love how easy they are to make ahead, and you can dress them up with any sprinkle mix to match the team colors or the season. They’re cute, refreshing, and they always disappear way faster than I expect.
Servings: 8 pops
Ingredients:
- 4 bananas
- 12 oz. chocolate chips
- 2 tbsp coconut oil
- Sprinkles
Instructions:
-
Peel the bananas and cut them in half.
-
Insert a lollipop or popsicle stick about an inch into the bottom of each banana half.
-
Melt the chocolate by microwaving it for 1.5 to 2 minutes, stopping to check and stir every 30 seconds.
-
Stir in the coconut oil until it’s fully melted and combined with the chocolate.
-
Dip each banana half into the chocolate, then place them aside to set.
-
While the chocolate is still wet, sprinkle your favorite toppings or sprinkles over the bananas.
6. Chocolate Hazelnut Bark
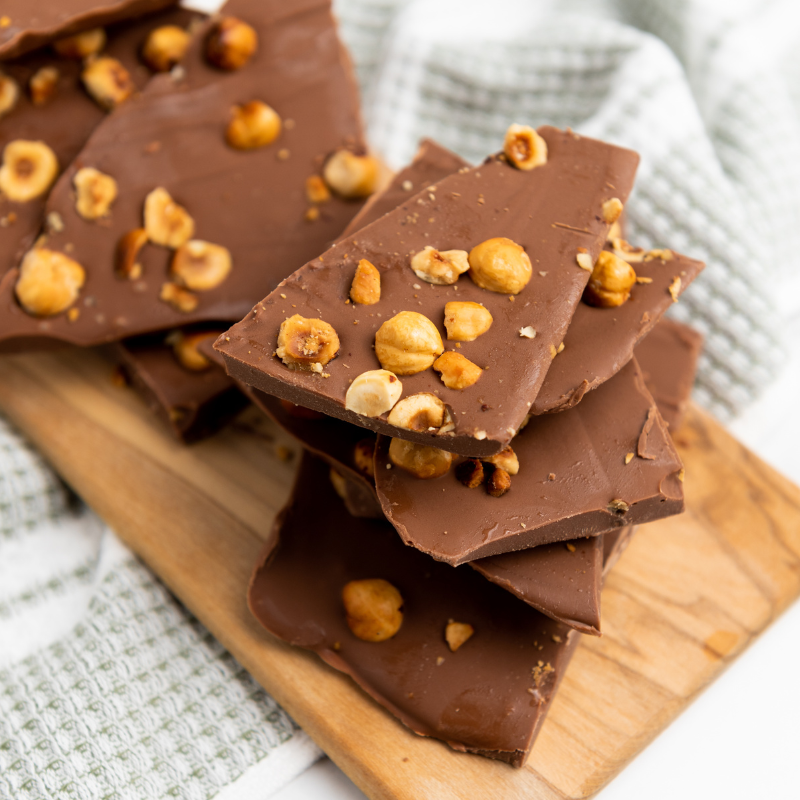
I love bringing this because it looks fancy, tastes amazing, and takes almost no effort at all. It’s one of those treats people keep nibbling on throughout the whole tailgate, and someone always asks who made it. The mix of rich chocolate and crunchy hazelnuts feels like a little upgrade from the usual game day sweets, and it packs perfectly in a container without melting into a mess. It’s simple, shareable, and just the right thing to set out when you want a sweet bite that doesn’t require plates or fuss.
Servings: 10-12
Ingredients:
- 2 bags (11 oz) of semi-sweet chocolate morsels
- 1/3 cup raw hazelnuts
Instructions:
- Preheat the oven to 350 degrees.
- Place the hazelnuts on a baking sheet and roast in the oven for 10 minutes.
- Once they are roasted, remove from the oven and let them cool for about 5 minutes.
- Then place the hazelnuts in a kitchen towel and shake around, until all the skins fall off the hazelnuts.
- Then melt the chocolate morsels in the microwave in increments of 30 seconds, until fully melted.
- Then spread out the chocolate and candy over the baking sheet, until it is spread out and even.
- Spread out the hazelnuts over the chocolate.
- Place the baking sheet in the fridge and let cool for at least 30 minutes.
- Then break into pieces and serve.
7. Chocolate Banana Bark

This is one of those snacks that feels playful and a little unexpected, and people always hover around the tray trying to guess what’s in it. The combination of bananas, peanut butter, and chocolate tastes like a frozen treat you’d dream up as a kid, but with that little sprinkle of sea salt it suddenly feels grown-up enough for game day. I love how easy it is to make ahead and stash in the freezer, and it packs beautifully for tailgating. It’s sweet, cold, and just the thing everyone needs when the afternoon gets warm and they want a quick bite of something delicious.
Servings: 6-8
Ingredients:
- 3 Large Bananas
- 10 Ounces Dark Chocolate Chips
- 1 Cup Creamy Peanut Butter
- 1 Tablespoon Coarse Sea Salt
Instructions:
-
Line an 11×15-inch baking sheet with parchment paper.
-
Cut the three bananas into ½-inch thick slices.
-
Arrange the banana slices on the baking sheet in a rough rectangle, leaving some space around the edges. They don’t have to be perfectly neat—just try to have the slices touching each other.
-
Put the peanut butter into a microwave-safe, pourable measuring cup. Microwave on high for 40 seconds, stirring halfway through at 20 seconds.
-
Drizzle the melted peanut butter over the banana slices, focusing more on the center to avoid dripping off the edges. Use a rubber spatula to gently spread it evenly over the bananas.
-
Freeze the baking sheet with the bananas and peanut butter for about 30 minutes.
-
While that’s freezing, place the chocolate chips in a clean, microwave-safe pourable cup. Microwave on high for 2 minutes, stirring every 30 seconds, until the chocolate is smooth and fully melted.
-
Take the baking sheet out of the freezer and pour the melted chocolate over the peanut butter and bananas, again keeping the chocolate mostly centered.
-
Use a clean rubber spatula to gently spread the chocolate evenly over the peanut butter layer.
-
Sprinkle sea salt over the top, then return the baking sheet to the freezer for 20–30 minutes, or until the chocolate is firm.
-
Once hardened, break into pieces and enjoy!
8. Chocolate Caramel Pretzel Bark

This one is always a hit because it mixes sweet, salty, and crunchy in the best possible way. I love setting out a tray and watching people break off little pieces every time they walk past, like they’re trying not to admit how addictive it is. It feels like a fun twist on classic game day snacks, but with enough chocolate and caramel to make it feel like dessert too. Plus, it travels so well and looks impressive even though it’s incredibly simple to pull together before heading out to the tailgate.
Servings: 16 pieces
Ingredients:
- 2 cups Semi-Sweet Chocolate
- 1 ½ cups Mini Salted Pretzels
- ½ cup M&M’s
- ½ cup Peanuts, chopped
Homemade Salted Caramel:
- 1 cup Sugar
- ½ cup Butter
- ½ cup Heavy Cream
- ¼-1/2 teaspoon Sea Salt
Instructions:
- Line a baking sheet with parchment paper and spread the pretzels out in an even layer.
- Melt the semi-sweet chocolate using either a double boiler or the microwave. If using the microwave, place the chocolate in a microwave-safe bowl and heat in 30-second intervals, stirring well after each, until fully melted and smooth.
- Pour the melted chocolate over the pretzels, then sprinkle the M&M’s and chopped peanuts evenly on top.
- To make the caramel, add the sugar to a medium saucepan over medium heat, stirring constantly until it melts, forms clumps, and turns a light amber color.
- Add the butter carefully (it will bubble), then whisk until it’s fully melted into the sugar.
- Slowly drizzle in the heavy cream while whisking. Let the mixture boil for 1–2 minutes, then remove from heat and stir in the sea salt.
- Drizzle the caramel over the chocolate and pretzel mixture. (You may not need all of it.)
- Place the pan in the refrigerator to chill for several hours, or freeze to speed up the process.
- Once firm, cut into squares or break into pieces and serve.
9. Churros Cheesecake Bars

I love bringing these along because they taste like two desserts collided in the best possible way, and everyone gets excited when they spot them on the table. They’re buttery, cinnamon-sweet, and creamy in the middle, which makes them perfect for snacking between plays. They also travel really well, so I can bake them ahead of time and slice them right before serving. It’s one of those treats that feels a little extra without actually being hard to make, and the whole pan disappears faster than you’d expect.
10. Corn Dip

This is one of those bowls I set down and immediately see people crowd around with chips in hand. It’s creamy, a little smoky from the bacon, and has just enough kick to keep things interesting. I love making it because it comes together in minutes and tastes even better after it chills, which makes it perfect for tailgating. It’s the kind of dip that keeps everyone snacking long after they say they’re “just having one more scoop.”
GET THE RECIPE11. Corn Dogs

These always feel like the ultimate throwback treat, and they fit right in at any tailgate. I love how they bring out everyone’s inner kid the moment they hit the table. They’re crispy, golden, and so easy to grab on the go, which makes them perfect when the crowd is moving around and chatting. Plus, they’re fun to make and even more fun to eat, and there’s never a single one left by the time the game starts.
GET THE RECIPE12. Cuban Egg Rolls

These are such a fun twist to bring to a tailgate because they take a classic sandwich everyone knows and turn it into a crispy little handheld bite. I love watching people try them for the first time because you can always see that moment of surprise when the flavors hit. They’re easy to make ahead, they travel well, and they’re one of those snacks that feel a little special without requiring a ton of work. Every time I set out a batch, they vanish long before anything else on the table.
GET THE RECIPE13. Ham & Cheese Sliders
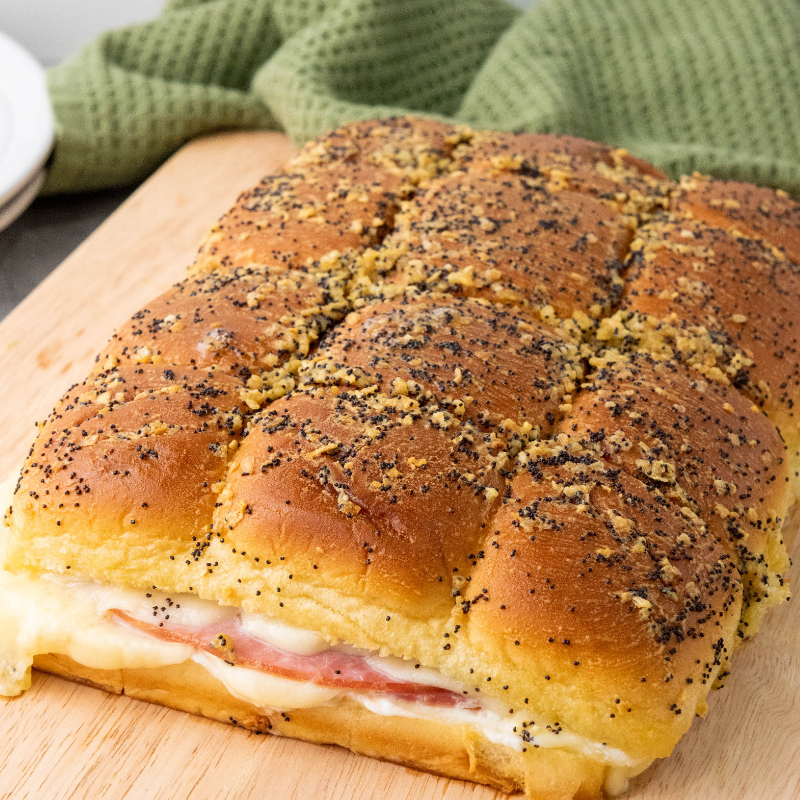
These are always a guaranteed win at any tailgate because they’re warm, cheesy, and just the right size for grabbing as you walk by. I love how easy they are to prep ahead, and once they hit the oven, the whole kitchen smells amazing. They come out melty and buttery with that little poppy seed topping that makes everyone reach for seconds. They’re simple, comforting, and one of those snacks that disappears long before the game even starts.
GET THE RECIPE14. Japanese Pork Cutlet Sandwiches

I love bringing these along because they feel a little unexpected at a tailgate, yet they fit right in with all the handheld snacks everyone loves. The crispy pork, soft bread, and tangy sauce make every bite so satisfying, and people always perk up when they see something a bit different from the usual lineup. They’re easy to slice into smaller pieces for sharing, and they hold up really well, which makes them perfect for a day outside. It’s one of those snacks that gets people talking before they even take a bite.
Servings: 2
Ingredients:
For the Pork Cutlets:
- 2 pork cutlets (5–7 oz each / 150–200 g)
- 1 egg, beaten
- ⅔ cup panko breadcrumbs (75 g)
- ⅓ cup all-purpose flour (50 g)
- 1 tsp salt (5 g)
- ½ tsp black pepper (1 g)
- Oil for frying
For the Sauce:
- 2 tbsp ketchup (30 ml)
- 1 tbsp soy sauce (15 ml)
- 1 tsp honey or sugar (5 ml or 4 g)
- ½ tsp Worcestershire sauce, optional (2.5 ml)
For the Sandwiches:
- 4 slices soft white sandwich bread (crusts removed)
- 2 tbsp mayonnaise (30 ml)
- Lettuce or shredded cabbage
- Sliced cucumber, optional
Instructions:
-
In a small bowl, combine the ketchup, soy sauce, honey, and Worcestershire sauce (if using) and stir until smooth.
-
Pound the pork cutlets to about 1 cm (⅓ inch) thick between sheets of plastic wrap. Season both sides with salt and pepper, dredge in flour, dip in beaten egg, and coat with panko breadcrumbs. Heat oil in a skillet over medium heat and fry the cutlets for 3–4 minutes per side until golden and crispy, then transfer to paper towels to drain.
-
Spread mayonnaise on one side of each bread slice. On two slices, layer lettuce or cabbage, then place a hot pork cutlet on top. Drizzle with the prepared sauce, add cucumber slices if desired, and close with the remaining bread slices, mayo side down.
-
Trim the edges if you like, then cut the sandwiches in half or into thirds. Serve right away while the cutlets are still warm and crispy.
15. Mac & Cheese Bites

These always feel like the ultimate comfort food snack, and they disappear so fast every time I bring them to a tailgate. They’re crispy on the outside, creamy on the inside, and just the right size to pop in your mouth while you’re hanging out with friends. I love how fun they are to make and how easily they pair with any dipping sauce you’ve got on hand. They’re warm, cheesy, and totally irresistible, which makes them perfect for game day grazing.
16. Mini Caprese Pizzas
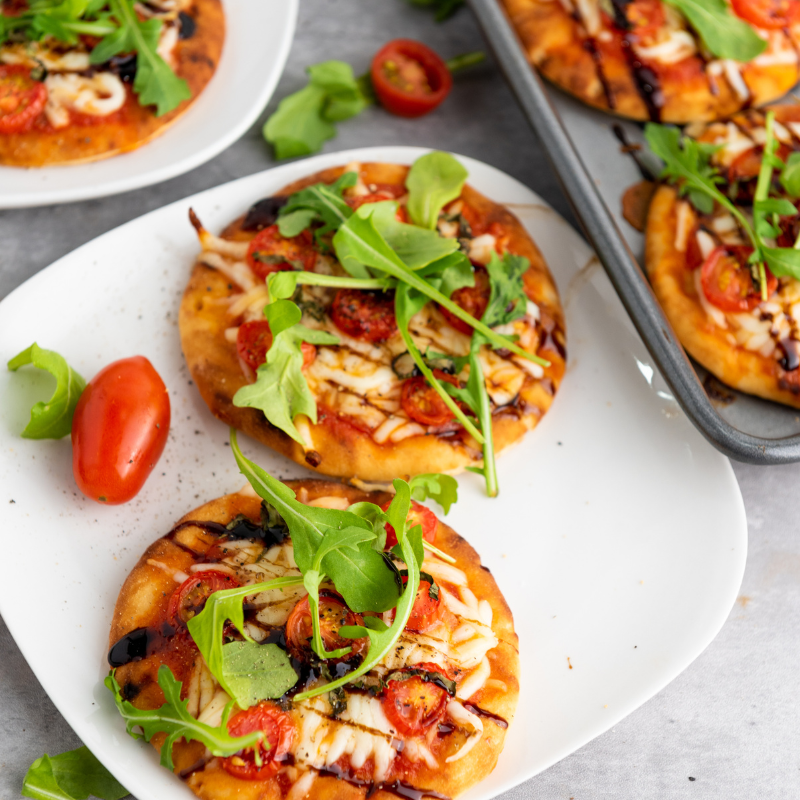
These feel like such a fresh little bite to bring to a tailgate, and they always add a nice pop of color to the table. I love how quick they are to throw together, and they taste like a fun mash-up of pizza and a caprese salad, which somehow makes them feel a little fancy without any extra work. They’re warm, melty, and easy to eat with one hand while chatting, and people always grab them fast because they look so inviting. They’re simple, tasty, and a great way to mix things up from the usual game day snacks.
GET THE RECIPE17. Oreo Cake Pops

These are always a hit because they look adorable and taste even better. I love bringing them to tailgates since they’re easy to grab, super fun to decorate, and perfect for anyone who wants a little sweet bite between all the savory snacks. They hold up really well in a cooler, and you can dress them up with sprinkles or crushed cookies to match team colors. They’re simple, no-bake, and they always get people smiling before they even take a bite.
Servings: 20 pops
Ingredients:
- 2 cups Oreo cookies, crushed (250 g)
- 4.5 oz cream cheese (125 g)
- 7 oz chocolate (milk, dark, or white) (200 g)
- 1 tbsp coconut oil (optional, for a smoother coating) (15 ml)
- Decorations: sprinkles, crushed cookies, chopped nuts, chocolate shavings
Instructions:
-
Blend the Oreo cookies in a food processor until they form fine crumbs. Add cream cheese and mix until a smooth, uniform dough forms.
-
Roll the mixture into balls, about 1 inch (3 cm) in diameter, and place them on a plate. Refrigerate for 20–30 minutes or freeze for 10 minutes to firm up.
-
Melt the chocolate in a double boiler or microwave in 15–20 second intervals, stirring until smooth. If using, stir in coconut oil for added shine and smoothness.
-
Insert a stick or skewer into each chilled ball and dip each one into the melted chocolate, rotating to coat evenly.
-
While the chocolate is still soft, sprinkle with your choice of toppings. Place the pops on parchment paper and let them set at room temperature or in the fridge.
-
Once the coating is fully hardened, serve and enjoy your no-bake Oreo cheesecake treats!
18. Oven-Baked Cinnamon Pretzels

These are one of my favorite sweet snacks to bring along because they’re so simple but always get big reactions. They smell amazing the moment they come out of the oven, and that warm cinnamon-sugar coating makes them seriously hard to stop snacking on. I love how easy they are to toss together right before heading out, and they’re perfect for filling little bowls around the tailgate so people can grab a handful as they wander by. They’re crunchy, cozy, and just different enough to stand out on the table.
GET THE RECIPE19. Pecan Bacon Cheese Ball

I love making this because it feels like such a crowd-pleaser, and it always looks impressive with barely any effort. The mix of smoky bacon, crunchy pecans, and creamy cheese makes every bite so satisfying, and people flock to it the second it hits the tailgate table. It’s easy to prep ahead, and it pairs with everything from crackers to veggies, so it disappears fast. It’s one of those snacks that feels homemade and hearty, which is exactly what everyone wants on game day.
GET THE RECIPE20. Pumpkin Feta Phyllo Cups

I love bringing these along when I want something a little different on the tailgate table. They’re warm, flaky, and packed with that cozy pumpkin-and-feta combo that always gets people talking. They look so pretty lined up in a muffin tin, but they’re actually really simple to put together, which is a huge win on a busy game day morning. They’re the perfect two-bite snack, easy to grab as you walk by, and they always make the spread feel a little more special.
GET THE RECIPE21. Reese’s Oreos

I love making these because they’re the easiest little treat to pull together, yet everyone goes wild for them. They’re chocolatey, peanut-buttery, and look so cute on a tailgate table with all those bright Reese’s pieces on top. They travel perfectly in a container, and they’re the kind of sweet bite people snag as they walk by, then circle back for another. It’s such a simple idea, but it always gets big reactions and disappears fast.
Servings: 6
Ingredients:
- 10 oz Ghirardelli’s milk chocolate melting wafer
- 6 Oreo cookies
- 1 box Reese’s pieces
- 4 tablespoons peanut butter
Instructions:
-
Melt the chocolate in the microwave on defrost mode for 2 minutes. Stir well. Continue melting for another 1 ½ minutes, then stir again until smooth.
-
Spoon a layer of chocolate into each mold, place an Oreo cookie on top, and cover with more chocolate until the mold is just filled.
-
Place the molds in the freezer for about 10 minutes, or until the chocolate has hardened.
-
Heat the peanut butter in the microwave for 45 seconds, then stir until smooth. Transfer to a piping bag, snip the tip, and drizzle over the chocolate-covered Oreos.
-
Top with Reese’s pieces and let set until dry.
-
Serve and enjoy!
22. Smoked Salmon Dip

I love bringing this along when I want something a little more grown-up on the tailgate table, and it always gets people curious the moment they spot it. It’s creamy, savory, and full of that smoky flavor that makes every bite feel special without being fussy at all. It pairs perfectly with crackers or crostini, and it’s one of those dips that somehow disappears even faster than the classics. It’s simple to whip up, travels well, and always earns a few “wow, what is this?” comments.
GET THE RECIPE23. Sun-Dried Tomato & Turkey Pinwheels

I love bringing these because they’re so easy to make ahead and they always add a fresh pop of color to the tailgate spread. They’re light, flavorful, and perfect for grabbing with one hand while chatting with friends. The sun-dried tomato spread gives them such a nice little kick, and the layers of turkey, cheese, and lettuce make them feel hearty enough to stand beside all the heavier snacks. They slice up beautifully, travel well, and always disappear way quicker than I expect.
Servings: 12 pinwheels
Ingredients:
Sun-Dried Tomato Spread:
- 2 oz cream cheese, at room temperature
- 2 tbsp sun-dried tomatoes in oil, drained and chopped
- 2 tbsp mayonnaise
- 4-5 dashes Tabasco sauce
- kosher salt
- ground black pepper
Pinwheel Sandwiches:
- 2 tortilla wraps, 9 inch
- 150-200 grams sliced turkey breast
- 4-6 leafs of lettuce, boston or butter lettuce
- 6 slices cheese, cheddar, provolone, or monterey jack, or havarti
Instructions:
-
In a small bowl, combine the cream cheese, sun-dried tomatoes, mayonnaise, and Tabasco sauce until well blended. Season with salt and pepper to taste.
-
Lay out the tortillas and spread the cream cheese mixture evenly over the entire surface.
-
Cover each tortilla with 4-5 slices of sliced turkey, leaving a bit of space on one end. Add cheese and lettuce along the center of the tortilla.
-
Roll the tortilla tightly, starting from the end with the deli meat set back from the edge.
-
Store the rolled tortillas in the fridge, seam side down, in a baking dish or wrapped in plastic wrap until ready to serve.
-
Slice the rolled tortillas into 1-inch slices to yield 6-7 pinwheels per tortilla. Use a toothpick to secure them if desired.
24. Sweet Potato Bites

I love bringing these along because they’re such a fun mix of sweet, toasty, and a little bit nostalgic. They look adorable on the table and always get people asking what they are before grabbing one. The warm sweet potato, gooey marshmallow, and crunchy pecan make them feel like a tiny bite of fall, which fits perfectly with game day season. They’re easy to make ahead, they travel well, and they’re just different enough from the usual tailgate snacks to stand out in the best way.
GET THE RECIPE25. Waffle Pops

I love bringing these because they’re such a fun, playful treat that instantly brightens up the tailgate table. They’re easy to hold, easy to customize, and everyone gets a kick out of grabbing a waffle on a stick. The colors and glazes make them look extra festive, and you can switch up the decorations to match team colors, which people always notice. They travel well, they’re great for kids and adults, and they add a sweet little moment to all the savory game day snacks.
Servings: 6
Ingredients:
For the Waffle Batter:
- 1 ½ cups all-purpose flour
- 2 tablespoons brown sugar
- 1 tablespoon baking powder
- ½ teaspoon salt
- 1 large egg
- 1 cup almond milk
- ⅓ cup vegetable oil
- 1 teaspoon vanilla extract
For the Glaze:
- 1 cup powdered sugar
- 2 tablespoons milk (more if needed)
- ½ teaspoon vanilla extract
- Pink food coloring (for decoration)
For the Chocolate Dip:
- 1 cup chocolate chips
Other:
- Lollipop sticks or stiff skewers
- Sprinkles (optional)
Instructions:
-
In a large bowl, whisk together the flour, brown sugar, baking powder, and salt. In another bowl, combine the egg, almond milk, vegetable oil, and vanilla extract. Pour the wet ingredients into the dry ingredients and mix until just combined. Do not overmix. Divide the batter into separate bowls based on the number of colors you want to make. Add a few drops of food coloring to each bowl and mix until the desired color is achieved.
-
Preheat your waffle maker according to its instructions. Lightly grease the waffle maker if necessary. For each waffle, pour a small amount of batter onto the hot waffle maker. Close the waffle maker and cook until golden brown (about 3-5 minutes, depending on your maker). Insert a stick while the batter is not fully cooked to ensure it is solid.
-
In a bowl, mix together the powdered sugar and milk. Adjust the milk for your desired consistency. Divide the glaze into two small bowls. Add pink food coloring to one, and leave the other one plain.
-
In a microwave-safe bowl, combine the chocolate chips. Microwave in 30-second intervals, stirring in between, until smooth.
-
Dip the top of each waffle lollipop into the chocolate dip, allowing any excess to drip off. Immediately drizzle or dip in the colored glaze, and top with sprinkles if desired. Use a spoon to drizzle pink and white glaze onto the waffles, having fun and creating different designs!
-
Arrange the waffle lollipops upright in a container or on a platter for a decorative presentation. Enjoy your colorful and delicious spring treat!
26. Hot Dogs

I always throw these into the tailgate lineup because they’re a total classic and everyone’s happy to see them. They’re quick, easy, and you can dress them up with whatever toppings you’ve got on hand. I love how simple they are to make in the air fryer, especially on busy game days when I don’t want to fuss with a grill. They’re warm, satisfying, and just one of those no-brainer snacks that always gets eaten.
Servings: 4
Ingredients:
- 4 Hot Dogs
- Hot Dog Buns (optional)
- Mustard (optional)
- Ketchup (optional)
Instructions:
-
Arrange the hot dogs in the air fryer basket in a single layer with a little space between each one.
-
Air fry at 375°F for 10 minutes.
-
Serve the hot dogs in buns with ketchup, mustard, or your favorite toppings.
27. Hot Honey Chicken Tenders

These are always a hit because they strike that perfect balance between crispy and spicy, and everyone loves them straight off the tray. I like making them for tailgates because they’re easy to prep, they cook quickly, and they taste amazing whether you drizzle the hot honey or serve it on the side. They’ve got that crunchy coating that makes people do a double take, and they’re hearty enough to keep everyone satisfied while hanging out before the game. They fly off the platter every single time.
Servings: 4
Ingredients:
- 2 large boneless, skinless chicken breasts, cut into tenders
- 2 large eggs
- 2 tablespoons milk
- ½ teaspoon salt
- ½ teaspoon black pepper
- ½ teaspoon garlic powder
- ½ teaspoon smoked paprika
- ½ teaspoon onion powder
- 3 cups cornflakes, crushed into small pieces (not too fine)
- Cooking spray or oil (for baking/air frying)
- Store-bought hot honey (for drizzling and dipping)
Instructions:
-
Preheat the oven to 400°F (200°C) and line a baking sheet with parchment paper, or preheat the air fryer to 375°F (190°C) and spray the basket with cooking spray.
-
In a bowl, whisk together eggs, milk, salt, black pepper, garlic powder, smoked paprika, and onion powder. Place the crushed cornflakes in a separate shallow dish.
-
Dip each piece of chicken into the egg mixture, ensuring it’s fully coated, then roll in the crushed cornflakes, pressing gently to ensure they adhere. Place the coated chicken on the prepared baking sheet or air fryer basket.
-
For the oven, bake for 18-22 minutes, flipping halfway, until golden brown and the internal temperature reaches 165°F (75°C). For the air fryer, cook for 12-15 minutes, flipping halfway, until crispy and cooked through.
-
Drizzle store-bought hot honey over the crispy chicken or serve it on the side for dipping.
28. Golden Parmesan Herb Potato Bites

I love making these because they’re crispy, cheesy, and honestly just the kind of snack people can’t stop grabbing. They’re perfect for tailgating since you can prep the mixture ahead of time and fry them up quickly before heading out, or even reheat them on site if you’ve got a setup. They’re warm, comforting, and so fun to dip, which always makes them disappear fast. Every time I bring them, someone asks for the recipe before the game even starts.
GET THE RECIPE29. Mini Pigs in a Blanket

I always make these for tailgates because they’re such a fun, nostalgic little bite that everyone recognizes and reaches for right away. They’re warm, buttery, and so easy to eat while you’re chatting or hanging around waiting for kickoff. I love how quick they are to put together, and they pair perfectly with all the classic dipping sauces. They’re simple, crowd-pleasing, and they never last more than a few minutes on the table.
GET THE RECIPE30. Classic Italian Muffuletta Sandwich

I love bringing this to tailgates because it feels hearty and bold, and it feeds a crowd without any fuss. Once it’s pressed and sliced, it’s the easiest grab-and-go sandwich, and every single bite is packed with those big Italian flavors everyone loves. It holds up beautifully in a cooler, and the longer it sits, the better it gets, which makes it perfect for game day. It’s one of those options that looks impressive on the table but takes almost no effort once the layers are stacked.
Servings: 4
Ingredients:
- 1 round Italian bread loaf or large ciabatta
- 5 oz prosciutto (100 g)
- 5 oz mortadella (100 g)
- 5 oz salami piccante (100 g)
- 5 oz regular salami (100 g)
- 7 oz Gouda or Edam cheese (200 g), sliced
- 4–5 tbsp olive tapenade or olive spread
- 75 oz pickled vegetables (50 g), such as peppers and pickles, chopped
Instructions:
-
Slice the bread horizontally and hollow out a little of the inside if you need extra space for the filling.
-
Spread a generous layer of olive tapenade over the bottom half.
-
Add the meats in order, starting with salami, then prosciutto, salami piccante, and mortadella.
-
Lay the cheese slices evenly over the meat.
-
Spoon the chopped pickled vegetables on top for added crunch and tang.
-
Place the top half of the bread on and press down firmly.
-
Wrap the whole sandwich tightly in plastic wrap.
-
Set it under a weight, like a heavy pan or a cutting board with books, and let it sit for 30 minutes at room temperature.
-
Unwrap, slice into quarters or wedges, and serve.
Tailgating is all about good food, good company, and having something fun to snack on while the excitement builds. I love putting together a spread that feels a little playful, a little comforting, and totally ready for a crowd, and every one of these ideas brings something delicious to the table.


